Confused firmly believes that there are a few things in life as glorious and uplifting as ghee. Considering the amounts that she uses in her cooking, I am prone to believe that it gears more towards the 'upsizing' things, if you know what I mean. But hey, after the last post, I think some people have got the rather misguided impression that this blog is about healthy cooking. Being such unapologetic lovers of good (and succulently unhealthy) food, it causes us to shudder so forcefully, that we dropped our gulab jamoons right out of their sugar syrup. So, we figured we might as well set the record straight.Since Confused is out at the battlefield, while I sit at home to watch the kettle, she has, in the spirit of valiant generosity, left the recipe in my inbox to post. So, without much ado, ladies and gentlemen, let us present for you, the darling of khaataa-peeta khandhans, the stayer on the hips, the deliciously simple, yet flabulously yummy,The Aunty-impressing Ghee Rice a.k.a Nei Chor So you will need:One cup of rice (One could argue that this demands the royal basmati variety, but if you want to save your money for all the ghee, ask your local storekeeper around the corner, a.k.a kiranawalla for biryani rice, or jeera rice)Onion (we prefer the pink ones)Ghee (as much as your C2 levels [conscience and cholesterol levels, for the uninitiated] allow)Cooking oil (well, again depending on your C2 levels, according to Confused, one should not be stingy about these things, but then, you be the judge)Soak the rice in water for about 45 minutes to an hour--after thoroughly washing it, at least thrice first as the norms of the Kaliyuga demand from us the additional mile of caution.Thinly slice the onion. the thinner, the better. This, if you are a novice can take considerable amounts of practice. But do not be disheartened if your onion slices cannot make the cut for Fashion TV ramps at the first go. Just keep at it, and as Shiv Khera says, "You can do it!". Now, the good thing about the onions in this recipe is that you have to make sure the various layers have been separated. So think of all those people on your hit list, and lovingly squeeze the sliced onions between your fingers in this rotating motion, so as to separate the various layers. This also helps the onion slices to become tender and easier to brown, but that purpose is only secondary to the therapeutic venting of repressed vengeance. Once the onions are sufficiently broken, they are now ready to be fried.Pour some ghee (about two tablespoons) in your cooker (If, despite your best efforts, your C2 acts up, tell your self that you can go a bit unhealthy here, since you are getting all our nutrition from the dal or the chicken, preferably, that will have to accompany the rice). Once the ghee is hot (DO NOT put your finger or any body part in the ghee to check. Let's just assume, for the purposes of this experiment that 1 min on fire is good enough to heat the ghee), put in the onions.Once the onions have fried in the ghee (just golden brown, not dark brown, mind you), put the soaked rice in the ghee (without removing the onions), and add some oil. The ultimate bliss of ghee rice, is to cook it with pure, unadulterated ghee, but then, burning off those calories might take a lifetime, so we suggest that you just add oil (two teaspoons, for starters).Now is the difficult bit. Stir the rice in the cooker, till it becomes hard to stir. The real test to see if the rice is done, is to move it about, and check the rice at the bottom of the cooker. If it is properly "fried", then the rice tends to bounce up and down, like those magic crackers that pop in your mouth. Once you reach there, pour in two cups of water (the same cup that you used to measure the rice, please), add some salt (one to two teaspoons is the usual, depends on your taste), close the cooker, wait for five minutes, for the steam to rise through the tunnel thing on top, and then put the weight on.Once the cooker gives out one high-pitched whistle, switch the gas off. Wait for the steam to completely let out, and then pop the cooker open. The rice SHOULD be done, however, there are some varieties of rice that require more cooking (one can never be sure these days, after all, it's the Kaliyuga, remember?). So check if the rice is done--best method being to pop a few grains into your mouth. If they are soft, good, if they are still a li'l stubborn and solidly stony, pour a few tablespoons of water and steam with the cooker partially closed. Once you are done, the end product should look something like this: For those who like to experiment with spices (Confused does not, Crumbs does. So well, you pick the sides), you can add a small piece of cinnamon, about two cloves, and some cardamom. If you chose to go with the spices, then you should pop them in the first thing in the ghee, wait for about 3 secs, and then add the onions. Now, these spices really do give this awesome aroma to the rice, and your kitchen, but if you have fussy kids around (and by fussy kids, Confused means herself), we suggest that you remove them before serving. The cardamom is easy to mask- you can remove the husk and put in only the seeds. But unless you want people making faces (which is what Confused often does, of course), remove the cloves as they are famous for their pungency.The final stage in this rather difficult culinary journey (Ha ha, see the clever use of irony there? No? Okay.) is the garnishing. After all, ghee rice, for all its internal beauty and wit, is quite the plain jessi to look at (without the bad haircut though). So you spruce up your rice by adding fried cashew nuts (fry them in ghee,no excuses for that), raisins, chopped coconuts, and so on. Add some yummy chicken and cool raita, and some nice fried pappadoms on the side, and you have a perfectly wonderful meal. And ta da! You are now ready to show off your rather fancy culinary skills to all and sundry and the next door aunty who never calls you for her endless dinner parties.
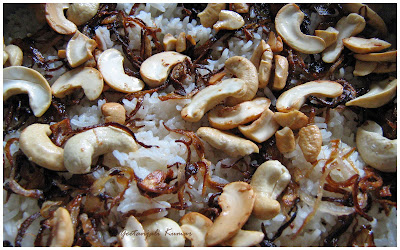 So folks, on that good smoke, it is time for our take off.
How does one begin a food blog? One could, of course, begin at the beginning, but then for that one would have to start with the big bang (or possibly before, if you are particular about details and such). One could. But that would be boring. and not to mention hardwork. So one will just jump right in someplace, and get on with it.
Introductions, you ask? We are people of the experiment-with-food kinds. We also think hyphens are cool. Since we have that out of the way, let's move on to the cooking part, shall we?
So, this is one of the healthiest (or so we like to think), easiest things to make. And what’s more, it is an original recipe. Which means that we did not look this up from anywhere, does not mean that we're the first or the only ones to think of this. A thing so simple as this, must have occurred to every lazy cook in some form, sometime. If it didn’t, then boo for you.
The beauty of this is that it is really a highly versatile dish. It can be as simple or as complex as one’s mood dictates. So, let us try to begin, as they say, at the very beginning (again). Of course, things can turn a rather prolific, Ferris wheel kind of turn in the middle. Just saying, not to scare you or anything.
So, presenting, ladies and gentlemen, for your perusal,
The Stir Fry 1.0
You will need:
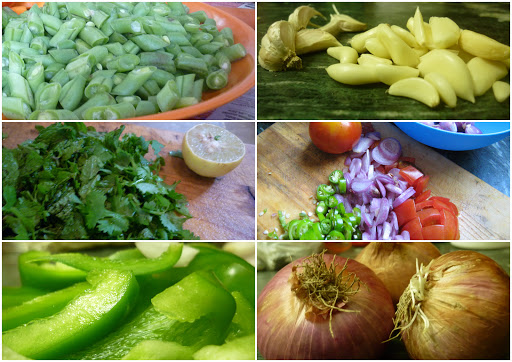
1 tomato (not too ripe, firmish)
1 bell pepper (green, yellow, red, go nuts)
1 onion (the unassuming pink variety, of average build)
1 carrot (orange ones, the fresher the better)
7-8 beans (We like them French. You could use the flat, tasteless ones too. After all, you are going to be eating it, and who are we to judge?)
Garlic cloves (the number depends on how much or how little you like the thing. We usually go for about 6-7, you could reduce/increase depending on the intensity of your love. Do not do away with it entirely though.)
Ginger (one half inch piece. Thickness of your thumb, if you are the thin kind. Index finger, if you are of the khatha-peeta kandhan kinds.)
Chilly flakes (crush 2-3 dry red chillies if you don’t have the habit of stocking up left over packets from pizza dinners.)
Oregano and basil (learn to stock seasoning, people! Really!)
Pepper (preferably crushed, not ground/powdered. If you don’t like pepper, we are not talking to you anymore.)
Okay, so once you have all of the above, you begin with the basics, which in this case is a frying pan (preferably a flat bottomed one). You add about 1-2 tablespoons of oil to it. Wait for exactly 5 seconds, then add the chopped garlic into it. Stir, keep at it till it turns the mildest shade of brown. Then you add the chopped ginger to it, stir (NOT very rigorously) for another 10 secs. Once that is done, you add the onion (which by now you should have chopped into this 1 cm square kind of pieces--remember, we use big chunky pieces for stir fry, chopping it too finely means that the veggies get overcooked, and eventually become one gooey, brown slush with some coloured bits in it. NOT what we are aiming for).
Once you add the onion, toss it about (with a spatula that is) for some 10-15 secs. Stand back, take in that glorious aroma that wafts up. Once you have enjoyed that for another 5 secs, add the beans (which you should cut through the center, and then into 1 inch long pieces), stir for 10 secs, then add the bell peppers and the carrot. Once the whole thing has been stirred for another 10 secs, change heat to medium, add the herbs, chilly flakes, and salt, mix and let it stand for maybe another 10 secs. Finally, add the tomatoes (cut the same way as the bell peppers and the onion), give it all a healthy tossing around, so that the veggies look sauteed and shiny, but not dead tired, then add the crushed/powdered pepper and take it off the fire immediately.
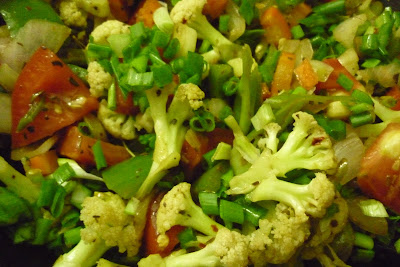
Add mint leaves, and ta da! you are done!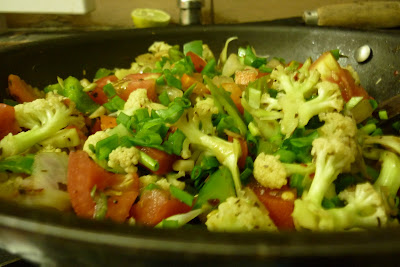
Now that we have the basics ready, time for the Ferris- wheel to turn. The beauty of the stir fry is that you can add whatever you want into it- like meat for instance. You can get cold cuts (thank god for supermarkets), add those after the onions, and then proceed with the rest like nothing happened. You could do the same with sausages. Or even tuna, if you like the taste of canned tuna (We don't, but like we said, we don't judge.) You could also add grated cheese, you could add other veggies (things that cook easily--cabbage, lettuce (if you are adding lettuce, add it at the very very very end, along with the pepper), spinach (again, add towards the end), corn (removed from the cob), potatoes (make sure you boil them first, unless you like your vegetables on the rocks)).
 Once you get the hang of it, you could even experiment with radical things like left-over dinner, lobsters and crab (the world could be your oyster. Oooh, you could even add oysters). We have never tried the last three, probably with good reason, but hey! what good is experimenting unless you get to blow a few things up.
On that good smoke, it's time for our take- off.


